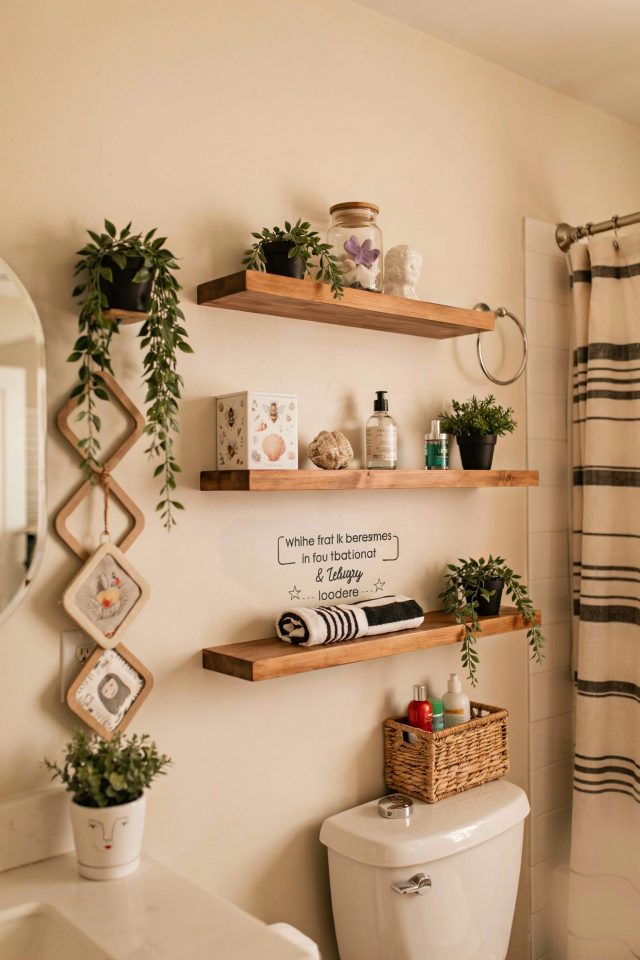
Why Bathroom Shelves Are a Game Changer for Small Spaces
If you live in a rental with a tiny powder room or own an older house with a cramped half-bath, you know the struggle of finding bathroom shelves that actually fit. I have been there, stacking toilet paper rolls on the back of the toilet and letting shampoo bottles crowd the tub edge. That is why I eventually built my own set of budget-friendly floating shelves. They gave me back valuable floor space, kept my counter clear, and cost less than a dinner out. In this post I will walk you through the exact same method I used, plus a few other small storage hacks that will not strain your wallet.
Small Bathroom Storage Ideas on a Budget That Actually Work
You do not need a complete remodel to get more storage. Start by looking at vertical wall space that is currently empty. A corner above the toilet or the area beside a medicine cabinet can hold a simple shelf. Small bathroom storage does not have to mean expensive cabinets or custom built-ins. I have used a single wooden plank mounted with L-brackets and it held all my everyday toiletries for two years. The trick is to measure carefully and pick a style that matches your decor without clashing.
Another trick is to reuse items you already own. An old wooden crate turned on its side makes a rustic wall shelf. A spice rack from a thrift store can hold tiny jars of cotton balls and Q-tips. When you focus on what you already have, your budget stays intact. Just be sure to seal any raw wood with a waterproof finish, especially in a bathroom where steam and humidity are constant.
DIY Floating Shelves: A Weekend Project Anyone Can Do
Building your own shelving is easier than you might think. I am not a professional carpenter, but I learned to make DIY floating shelves in a single Saturday morning. The secret is a simple cleat system. You cut two pieces of wood, one that attaches to the wall and one that slides over it. The shelf then appears to float with no visible brackets. For a small bathroom, I recommend using pine boards because they are cheap and easy to cut. A 1×6 pine board from a home improvement store costs around $8 and gives you enough material for two shelves.
- Tools needed: a saw (hand or circular), drill, level, stud finder, sandpaper, and paint or stain.
- Materials: pine board, wood glue, screws, wall anchors (if you cannot hit a stud), and a waterproof sealant.
- Time required: about two hours including drying time for paint.
Before you cut, mark where you want each shelf. Keep at least 12 inches of clearance above the shelf so you can easily grab bottles and towels. I also suggest placing the lowest shelf high enough that a tall shampoo bottle can stand upright underneath the shelf above it. That small detail saved me from having to tilt bottles every time I reached for them.
Best Materials for Budget Bathroom Shelving
Your choice of material makes a big difference in both cost and durability. For budget bathroom projects, I always recommend plywood over solid wood. A 2-foot by 4-foot sheet of half-inch plywood costs about $15 and yields multiple shelves. You can cut it into strips, sand the edges, and paint it with a semi-gloss latex paint that resists moisture. Another affordable option is a pre-primed MDF board. It is smooth, easy to paint, and does not warp as much as raw particleboard.
If you prefer a more natural look, reclaimed wood pallets can work. But be careful: pallets are often untreated and may harbor splinters or chemicals. Sand them thoroughly and seal with a clear polyurethane. I once made a shelf from an old fence board and it looked great, but I had to recoat it every few months because the humidity kept peeling the finish. That is why I now stick with plywood or pine and a good waterproof primer.
How to Organize Bathroom Shelves Without Clutter
Once your shelves are installed, resist the urge to pile everything on them. Bathroom organization is about grouping items by use and leaving a little breathing room. I use small baskets or glass jars to keep things tidy. For example, I keep a basket for extra soap bars and another for hair ties and clips. A single shallow tray holds my daily face wash and moisturizer so I can grab them quickly in the morning.
Towels look neat when they are rolled instead of folded. Rolling a hand towel and placing it on a shelf also saves space. I also store a few decorative items like a small plant or a framed photo, but I keep them to a minimum. Too many decorations make a small bathroom feel crowded. A good rule is to fill no more than half of each shelf surface with functional items, leaving the rest for open air and visual calm.
Money Saving Tips for Installing Shelves Yourself
Hiring someone to install shelves can cost $100 or more per shelf. Doing it yourself costs mostly the materials and a little sweat. Here are a few ways to keep your total under $30:
- Use a stud finder to avoid buying heavy-duty wall anchors. Screwing into a stud is free and much stronger.
- Buy paint samples instead of full cans. A small sample pot (about $5) covers two shelves with two coats.
- Check the lumber section for the culled lumber cart. Stores often discount odd lengths or slightly warped boards that are fine for short shelves.
- Borrow tools from a friend or a local tool library instead of buying a saw you might never use again.
One more thing: do not forget to check online marketplaces for free leftover wood from other people’s projects. I once scored a bundle of pre-cut oak boards for free just because someone was cleaning out their garage. With a little patience you can build sturdy shelves for next to nothing.
Decorating Your Bathroom Shelves on a Shoestring
You do not need fancy decor to make your shelves look intentional. I like to mix function with a hint of personality. A small succulent in a simple terracotta pot costs a few dollars and adds life to the room. A clear glass apothecary jar filled with bath salts looks pretty and serves a purpose. Even a stack of plain white hand towels arranged neatly can be a design element.
To keep the look cohesive, stick to two or three colors. For my own bathroom I use white, wood tone, and a soft green from my plant. That simple palette makes the shelves feel organized even when they are full. Avoid buying expensive decor just to fill space. Instead, use what you already own. A pretty ceramic soap dish or a vintage mirror leaning against the wall can become a focal point without costing a cent.
Final Thoughts on Budget Friendly Bathroom Shelves
Adding storage to a small bathroom does not have to drain your savings. With a few basic tools, some inexpensive lumber, and a little creativity, you can build bathroom shelves that are both useful and attractive. My own floating shelves have transformed a cluttered counter into a calm space where everything has a home. I hope this guide gives you the confidence to try your own project. Sketch out a simple plan, gather your materials, and give it a weekend. You will be surprised how much of a difference a couple of shelves can make.
If you found these tips helpful, share this post with a friend who is also tackling a small bathroom makeover. And do not forget to save this article to your Pinterest board so you can come back to it when you are ready to build.
#bathroomshelves #smallbathroomstorage #DIYfloating shelves #budgetbathroom #bathroomorganization