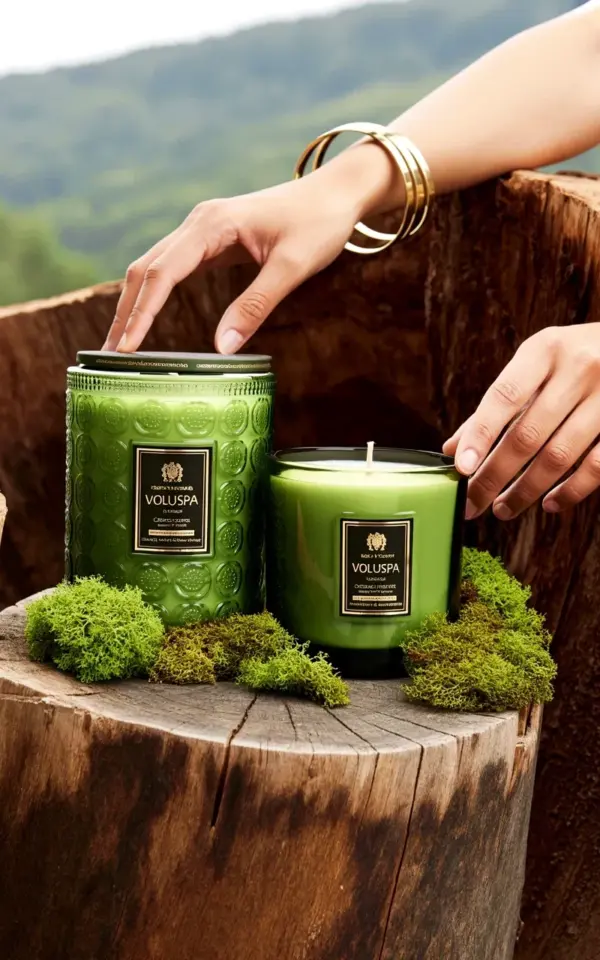
That photo is not staged for perfection, and that’s exactly why it works. You’ve got two green Voluspa candles on a weathered stump, moss bunched around the base like nature just dropped it there, and behind it all, a mountain view doing all the heavy lifting. This is the naturalcenterpiece idea that takes about four minutes to assemble, and honestly, it looks like you spent all afternoon on it.
Here’s the thing about Voluspa candles though. They don’t need a lot of help. The ornate glass jars with that embossed floral pattern are already doing most of the work, so the styling just has to get out of the way. No florals. No greenery spilling everywhere. Just a wood stump, some moss, and a light breeze from the window. Ok so let’s talk about how to actually pull this look together without overthinking it.
Why Wood Stump Candle Displays Work for Cozy Evenings
There’s a reason this combo keeps showing up in styled photos and not just on Pinterest. The wood stump gives you that grounded, cabin-in-the-woods feel that you can’t fake with a ceramic tray or a woven basket. It’s got texture, weight, and that lovely imperfect edge. Then you add the moss, which softens the transition between the rough bark and the polished candle glass, and the whole thing just clicks.
I think the real appeal is the contrast. You’re pairing something refined and luxurious with something raw and totally unpolished. The gold accents on the black Voluspa labels catch the light from the flame, and the green glass echoes the moss at the base. It feels intentional but not fussy.
This setup is also ridiculously forgiving. If your stump isn’t level, if the moss is a little lopsided, if the candles are slightly off-center, it still looks good. Nature doesn’t do straight lines, so you’re not fighting against unrealistic expectations here. That’s honestly the best part for people like me who can’t be bothered to perfectly arrange anything.
Finding the Right Wood Stump for Your Candle Styling Setup
If you don’t have a wood stump sitting in your garage, you can find one at a local nursery, a craft store, or even on Etsy. Some people order these pre-cut birch slices and glue them together to make a taller stump, but honestly, just getting a solid piece of a tree is way better. The heavier and more organic looking it is, the nicer your candlestyling will appear.
You want a stump that’s at least a few inches taller than the candle bases. The photo shows one large and one medium sized Voluspa jar, and they sit nicely because the stump gives them both room to shine. If the stump is too tall, the candles end up at eye level and the visual effect is lost. Too short and you’re basically just putting candles on the floor.
Check the top surface before you commit. It should be relatively flat, though you can always sand it down if it’s wobbly. And look for a piece with the bark still intact for that full natural effect. The weathered, brown surface in the reference photo is what you’re chasing, something that’s been drying out for a while and developed a silvery or deep brown patina.
How to Buy and Arrange Moss Without Making a Mess
Ok so moss. Real talk. Fresh moss is gorgeous but it can be damp, full of tiny bugs, and kind of a pain to deal with. I’m not saying don’t use it. I’m saying you should know what you’re getting into.
You can grab preserved moss from a craft store which is way easier to work with. It stays green, doesn’t require misting, and won’t leak water onto your stump. The photo shows bright green moss, so if you can find preserved sheet moss that matches that color, you’re in business. Alternatively, if you’re committed to real moss, look for it near streams or in damp, shaded areas. Just shake it out well before bringing it inside.
Arranging the moss is the fun part. You don’t want it covering the entire stump. Just tuck it around the edges of the wood, leaving the center relatively clear for the candle bases. Use small clumps and push them together like a puzzle. If you’re using preserved moss and it starts to shed, a light spritz of hairspray can help hold it in place. Weird tip but it works.
The hands in the photo, the ones with the gold bangles, are also worth mentioning. Styling your shot with a human element adds warmth, which is a nice trick if you’re planning to post this to social media. But for actual daily use, you don’t need the hands. Just the moss.
Best Voluspa Candle Scents for a Mountain-Inspired Look
The green glass jars in the photo are gorgeous, but the scent matters just as much as the aesthetic. For that mountain view and fresh moss vibe, you want something that smells clean and organic. Voluspa’s French Cade Lavender is a solid choice because it’s got that herbal note without smelling like a spa. It’s woody and floral at the same time.
Another option is the Goji Tarocco Orange, which might seem like an odd fit but actually works really well. The citrus cuts through the earthy tones of the moss and wood, keeping the whole setup from feeling too heavy. Summer Berries is also nice if you want something a little sweeter for a warm evening.
Here’s what I’d avoid:
– Anything with a heavy musk base, it fights with the natural smell of the wood
– The rose scents can feel too formal for a rustic stump
– Candy cane or seasonal winter scents clash with the green moss vibe
You’re aiming for a scent that feels like a deep breath of fresh air. That’s the whole point of bringing nature indoors with this kind of naturalcenterpiece. If you can crack the window open and have the candle burning, even better. The slight breeze will carry the scent around the room without overpowering everything.
Quick Styling Tips to Make the Candle Display Pop
Let’s get practical. You’ve got your stump, your moss, and your Voluspa candles. Here’s how to put it together fast and make it look photo-worthy.
Place the larger candle slightly behind the smaller one. It creates depth and prevents the arrangement from looking flat. The photo does this well, the big jar anchors the scene and the medium jar sits a bit forward and to the side. Tuck a few strands of moss up against the bases of both jars, not just around the outer edges. This makes the candles look rooted in place. Use odd numbers if you’re adding any extra elements, three small stones or a couple of pinecones fill out the look without cluttering it.
Lighting is underrated too. The candles are a luxury so try setting them up where the flame will catch the gold text on the labels. That little glint of gold against the green glass is the kind of detail that makes people stop scrolling when they see your photo. And for the love of everything, make sure the moss is dry before you light anything. Fresh moss that’s still wet can trap heat, which is not ideal.
Candle Styling With a Seasonal Twist
This setup isn’t just for summer or fall. You can absolutely make it work year-round by switching up the moss. In autumn, use a mix of preserved moss with small acorns or dried orange slices tucked around the base. It gives the woodstump a harvest feel that pairs beautifully with the candles.
For winter, you could dust a light layer of fake snow over the moss and add a few sprigs of pine. It completely changes the mood but keeps the foundation intact. And in spring, you can swap the bright green moss for a softer, greyer version that looks fresher and more delicate. The base stays the same, the story changes.
That’s what makes this a sustainable decorating idea. You’re not building something from scratch every few months. You’re just tweaking one or two elements. It saves money, it saves time, and it means you actually get to enjoy the candles instead of constantly fussing over the decor.
Where to Place Your Wood Stump Candle Centerpiece
The mountain view in the photo is a lucky addition, but not everyone has that backdrop. You can still pull this off in a living room, on a coffee table, or even on a bathroom counter. The key is to give the stump breathing room. Don’t crowd it with other decor pieces or it will read as clutter.
A sideboard or a low console table works really well. The height of a stump fills that awkward middle space that most decor struggles with. You don’t need to prop it up on books or pedestals. Let it sit directly on the surface, maybe with a single stack of old books nearby if you want to add some dimension.
And please don’t put this somewhere high. The whole point is to see the texture of the wood and the details of the candles up close. A fireplace mantle is fine, but a dining table or a kitchen island gives you that intimate view. The photo shows the candles at hand level, which is exactly where they should be.
One thing I’ve learned is that these stumps are not great for cramped spaces. They’re bulky and they tend to look slightly odd in tiny, modern apartments where everything is sleek and minimal. If your space is a little closer to the urban side, maybe use a thinner slice of wood or just a section of log that’s been cut flat on both sides.
Final Thoughts on This Natural Centerpiece Look
There’s a reason styled photos of Voluspa candles on wood stumps keep showing up. It’s easy, it’s forgiving, and it brings a tiny piece of the outdoors inside. The moss softens the edges, the wood anchors the scene, and the candles feel like the whole arrangement was made just for you.
If this worked for you or you try a variation, I’d love to hear how it turned out. Drop a comment below or tag me in your photo. I’m always curious to see how other people play with this idea, especially the scent combos. Happy styling, and go light a candle. You’ve earned it.
Leave a Comment