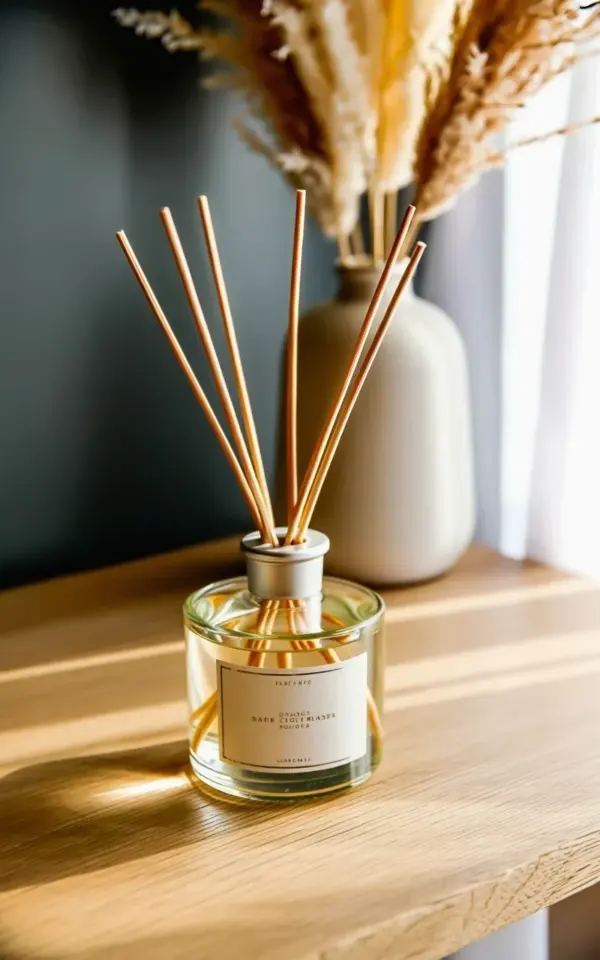
I used to think a reed diffuser was just a bottle with sticks, something you set on a shelf and forgot about. Then I tried a clear glass reed diffuser with wooden sticks arranged in a fan shape, paired with a vase of dried pampas grass, and the whole room changed. The soft sunlight cast diagonal shadows across the wood surface, and that subtle scent made the space feel warm and inviting. That experience taught me that reed diffuser styling with pampas grass is not just about fragrance, it is about creating a visual and sensory harmony. But most people (including me at first) make a few common mistakes that kill the effect. This guide walks through those blunders and shows you how to fix them, step by step.
Mistake 1: Using Too Few or Too Many Reed Sticks
The first time I set up my diffuser, I shoved all ten sticks into the bottle. I thought more sticks meant more scent. Instead, the fragrance flooded the room in a harsh way, and the oil evaporated in less than a week. On the flip side, using only two or three sticks gives almost no throw, so you end up leaning over the bottle to smell anything.
For a balanced result, start with half the sticks included in the pack. In the photo you see a fan pattern with about six to eight wooden reeds, which is perfect for a medium-sized living room. You can add one or two more if you want a stronger scent, but always wait 24 hours between adjustments. The fan shape not only looks intentional, it also exposes more surface area of the reeds without crowding the bottle opening. That keeps the scent consistent and the visual clean.
Mistake 2: Ignoring the Relationship Between Diffuser and Decor
Many people treat the diffuser as a standalone object, but the surrounding decor is half the magic. In the before version of my living room, the diffuser sat alone on a dark shelf and looked like a pharmacy bottle. The change happened when I placed it on a light wooden surface next to a white ceramic vase of dried pampas grass. The warm beige of the pampas grass echoed the wooden sticks, and the clear glass picked up the sunlight. Suddenly the diffuser belonged.
To avoid this mistake, look at your diffuser as part of a still life. Pair it with natural textures like dried grasses, woven coasters, or a stack of unbleached books. Keep the color palette muted so the glass bottle and the reeds can shine. The pampas grass in the photo is specifically useful because its fluffy, dry texture contrasts with the sleek glass and straight reeds. That contrast adds visual interest without clutter.
Mistake 3: Placing the Diffuser in Direct Sunlight or Near Heat
I made this one for months. I set my diffuser right on a windowsill where the afternoon sun hit it directly. I thought the sunlight would make the scent stronger. Instead, the heat broke down the fragrance oils, and the alcohol evaporated faster, leaving a faint chemical smell. The sticks also became brittle and cracked.
The photo shows the diffuser on a wooden surface with soft diagonal shadows, which means it is near a window but not under direct rays. That indirect light is ideal. Keep your diffuser away from radiators, air vents, and direct sun. A spot with morning light or filtered light, like a side table by a sheer curtain, keeps the fragrance stable and the sticks healthy. The pampas grass nearby also benefits from indirect light, because direct sun can make dried grasses fade and turn brittle.
Mistake 4: Forgetting to Flip the Sticks Properly
Flipping the reeds is the most common piece of advice you will hear, but doing it wrong ruins the experience. I used to flip all the sticks every day, which overloaded the room with scent for a few hours and then left it silent. The oil also got on my fingers and stained my tabletop.
Here is the better method. Flip only half the sticks at a time, and do it once a week or when the scent noticeably fades. When you flip, gently lift the sticks out, turn them so the dry end goes into the oil, and return them to the bottle. In the fan pattern shown in the photo, you can easily grab every other reed without disturbing the shape. Always place a small cloth underneath to catch drips. This keeps the scent consistent and your furniture clean.
Mistake 5: Choosing the Wrong Vessel or Oil Quality
Not all diffusers are created equal. I once bought a cheap ceramic bottle with a narrow neck, and the oil absorbed into the porous clay, wasting half the liquid. The fragrance also smelled synthetic, like a candle from a dollar store. The clear glass bottle in the photo is a smart choice because glass is non-porous, so none of the oil gets lost. You can see the level of liquid remaining, which helps you know when to order a refill.
For the oil, look for brands that use a high percentage of essential oils (at least 20 percent) rather than synthetic fragrance. The scent should be subtle even when you first open the bottle, not cloying. A fresh, clean scent like eucalyptus, lavender, or a light citrus works beautifully with the natural look of pampas grass. Avoid anything labeled “fresh linen” or “ocean breeze” because those usually rely on strong synthetic bases that clash with the warm, organic vibe you are creating.
Mistake 6: Overcrowding the Scene with Too Many Objects
In the enthusiasm of decorating, I used to put three vases, a candle, a stack of books, and a plant next to my diffuser. The result was visual noise, and the diffuser got lost. The pampas grass diffuser combination works because there are only two main elements: the clear glass bottle with its fan of sticks, and the single white vase of pampas grass. That is enough.
To achieve a similar look, keep your styling minimal. One diffuser, one complementary decor piece, and one surface with a light wood finish. The empty space around the objects is just as important as the objects themselves. In the photo, the diagonal shadows cast by the sunlight draw the eye across the wood surface and connect the two pieces. If you add more items, you break that visual flow. Stick to a maximum of two or three natural-textured items and let the light do the rest.
Mistake 7: Neglecting the Scent Longevity
Diffusers look beautiful, but they need a little maintenance to keep working. I have thrown away bottles that still had oil in the bottom because the sticks got clogged with dust or the fragrance stopped diffusing. The fix is simple. Every two to three weeks, wipe the exposed part of the reeds with a dry cloth to remove dust. Also check the oil level. When the bottle is less than a quarter full, the sticks struggle to pull up the oil through capillary action. At that point, either add a refill oil or replace the sticks with new ones.
Another trick for extending the life of your diffuser: give the pampas grass a gentle shake every few days. Dried pampas grass sheds tiny particles that can settle on your diffuser and the wood surface. A quick shake outdoors (or over a trash bin) keeps the display clean and the scent pure.
Before I adjusted these small habits, my reed diffuser setup looked nice for a week and then faded into background noise. Now, with the correct number of sticks, a mindful placement, and a simple pairing with pampas grass, the scent and the visual remain consistent for weeks. The room feels like a place I want to sit and read or have a slow conversation.
If you are considering a similar transformation for your own space, start by looking at what is already on your surface. Remove the clutter. Choose one diffuser with a glass bottle and a natural scent, and pair it with one dried element like pampas grass. Let the light do the rest. That combination turned my flat living room into a cozy corner I actually love being in. Give it a try, and see how a few small changes can change the whole energy of a room.
#ReedDiffuser #PampasGrassDecor #HomeFragrance #AromaticHome #DiffuserStyling
Leave a Comment