You’ve got the amber glass bottles lined up on the counter, a bag of rose petals that honestly smell incredible, and a DIY project that feels like pure self-care. Then you stuff those fresh petals into the bottle, pour oil over them, and wait for magic. Here’s the thing: that magic is going to turn into a sour, rancid mess in about a week. Making rose infused oil roller bottles with fresh petals is the single most common mistake I see in aromatherapy crafters, and it’s a total buzzkill when you have to throw the whole batch away.
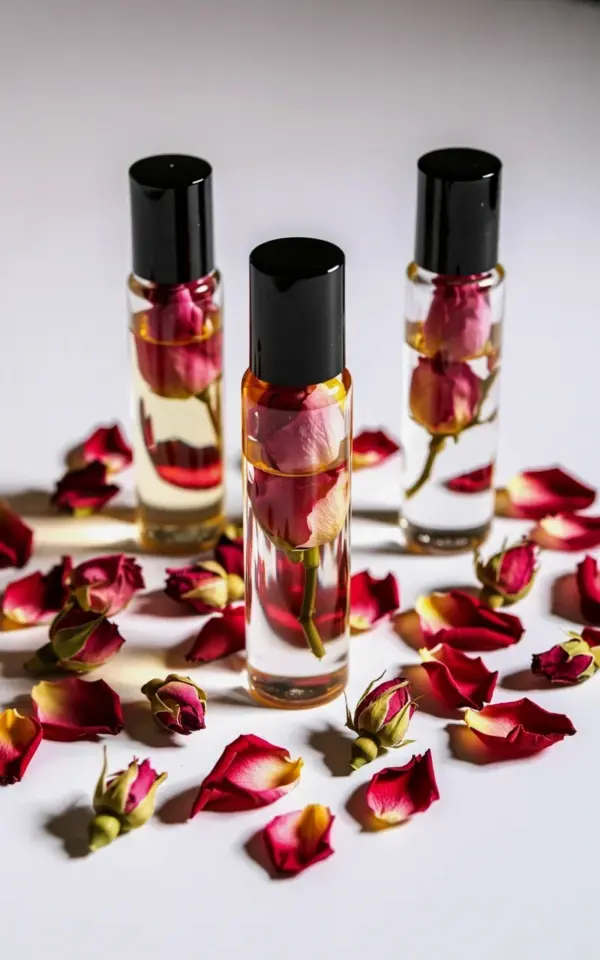
The photo above shows exactly what you want: three cylindrical roller bottles with black caps, sitting on a white background with dried rose petals scattered around. Notice the gradient, clear glass at the top fading into amber-toned oil at the bottom, with whole pink petals suspended inside. Those petals are bone-dry, curled, and preserved. That’s not a stylistic choice. That’s the difference between a blend that lasts months and one that goes bad before you finish the first roll.
Why Fresh Rose Petals Ruin Your Rose Infused Oil
Moisture is the enemy. Fresh petals carry water inside their cell walls, and when you submerge them in oil, you create a perfect anaerobic environment where bacteria and mold thrive. The oil goes rancid quickly, and you’ll notice a weird, off smell that nothing can fix.
The scientific explanation is boring, but the practical upshot is simple: dry petals, always. Even petals that look dry to the touch often retain internal moisture, so you need to dry them thoroughly, not just pat them with a paper towel. I learned this the hard way with a gorgeous batch of deep red petals from my garden. It smelled like a damp basement by day four.
If you’re using store-bought dried petals, check for any that feel soft or bendable. Those are not fully dried and will cause the same problem. You want petals that crumble slightly when you press them, but still hold their shape enough to look beautiful in the roller bottle.
How to Dry Rose Petals for DIY Essential Oil Blends
The best method I’ve found is air drying on a clean mesh screen or a wire rack. Spread the petals in a single layer, making sure none overlap, and leave them in a dark, dry, well-ventilated spot. Direct sunlight will fade their color and degrade the subtle scent, so a pantry or closet works better than a windowsill.
Depending on your humidity, this takes anywhere from three days to two weeks. You’ll know they’re ready when they feel papery and brittle, like the petals in the photo that are scattered around the bottles. Those curled brown rosebuds are actually perfect too, because they add a different visual texture and dry even faster than open petals.
For quicker batches, you can use a dehydrator on the lowest setting for four to six hours. But honestly, air drying is gentler and preserves more of the natural fragrance, which matters when you’re making a rose infused oil that will carry the scent.
The Amber Glass Bottle Advantage for Essential Oil Blends
Amber glass is not just for looks, though it does photograph beautifully. Those gradient bottles with the clear top and amber bottom are a sign of a properly made blend, because the oil has naturally taken on some color from the petals. The amber glass protects the oil from ultraviolet light, which accelerates oxidation and degrades the therapeutic properties of your aromatherapy blend.
Clear glass roller bottles are pretty, but they let in all that light. If you’ve spent time sourcing good organic rose petals and a carrier oil, you don’t want to sabotage the blend with a cheap clear bottle. The black caps on the bottles in the photo also help by keeping the contents dark, so don’t swap them out for something cuter that lets light in.
I’ll admit, I’ve bought rose-scented roller bottles with clear glass because they looked like little perfume vials. They were a waste of money. The oil went off in about three weeks, and the scent changed from rosy to something vaguely like old cooking oil.
How to Make a Rose Infused Oil Roller Bottle That Lasts
Start with a clean, dry roller bottle, preferably amber glass. Add your fully dried rose petals until they fill about half the bottle, then pour a carrier oil like jojoba, sweet almond, or fractionated coconut oil over the top. Use a small funnel to avoid spills, and leave about a half inch of headspace so the bottle doesn’t overflow when you put the roller ball on.
Cap it tightly and give it a gentle swirl. Then set it in a cool, dark place for two to four weeks, shaking it every couple of days. I know that waiting feels endless, but it’s the difference between a weak, pale oil and one that’s rich and rosy like the visible petals suspended in the photo.
After the infusion period, strain out the petals using a cheesecloth or a fine mesh strainer. You can press the strained petals to extract every last drop, though the oil will be slightly cloudy. For a cleaner blend, skip the pressing and just let gravity do the work. Then refill your roller bottle with the infused oil, and you’re ready to use it as a base for essential oil blends.
Common Mistakes to Avoid With Your Infused Oil
Everyone makes at least one of these the first time. I made three of them in a single batch, so take this as a friendly heads up.
– Using fresh or semi-dry petals, which causes rancidity (we covered this, but it’s worth repeating).
– Overfilling the bottle with petals, leaving no room for the oil to move. The petals will absorb oil and expand, so half full is the sweet spot.
– Skipping the strain. Leaving petals in for months might look pretty, but they can degrade and make the oil go cloudy.
– Adding essential oils to the mix before the infusion is complete. The heat and time can evaporate or alter the delicate essential oil compounds, so wait until after straining.
– Using a carrier oil with a short shelf life, like unrefined hemp oil. That will go rancid on its own no matter what you do.
– Storing the bottle in a bathroom, where humidity and heat changes can ruin the blend. Keep it somewhere cooler.
The last one is sneaky because most people reach for their essential oil products in the bathroom. But the steam from a shower will slowly break down the oil and the rose petals, even in amber glass. I keep mine in a little tray on the bedside table, partly for convenience and partly because it looks nice.
Ways to Use Your Rose Infused Oil in Aromatherapy Blends
Once you have a good rose infused oil, you can blend it with a few drops of essential oils to create a personal perfume or a calming roll-on. Rose pairs beautifully with lavender, sandalwood, and geranium. For a sleep blend, try two drops of lavender and one drop of chamomile in a roller bottle filled with your infused oil.
For a mood-lifting blend, add a drop of sweet orange and a drop of ylang-ylang. The rose base already feels warm and floral, so citrus gives it a bright edge. Just remember that your infused oil is already the carrier, so you don’t need to add more carrier oil unless you’re using a stronger essential oil like peppermint.
And before you put anything on your skin, do a small patch test on your inner wrist. Rose is generally gentle, but essential oils can be irritating if you’re sensitive. Wait an hour and check for any redness or itching. This is the practical, non-flashy part of aromatherapy that everyone skims over in blog posts, but it’s genuinely important.
You’ll also want to label your bottle with the date you made it. Rose infused oil in amber glass with dried petals will last about six months to a year if stored properly, but it’s hard to remember when you started the infusion. Write the date on a small sticker or a piece of washi tape, and you’ll never get caught off guard by an old blend.
The whole process is really about slowing down and doing things in the right order. Dry the petals fully. Wait for the infusion. Strain before blending. Store in amber glass, out of the light. None of these steps are difficult, but skipping one will make your beautiful roller bottle a science experiment you don’t want to open.
So gather those dried petals, find your little amber bottles from the photo, and make a batch the right way. Your future self, rolling on that soft rosy scent at the end of a long day, will be grateful you didn’t take the shortcut. Save this one for your next DIY essential oil project, and tell me in the comments if you’ve ever ruined a batch with fresh petals. I know I’m not the only one.
Leave a Comment